1965 Airstream Safari

1965 Airstream Safari
Coming Home

Wednesday, November 26, 2014

Happy Thanksgiving - I am thankful for progress!


I cannot believe how fast time is going by.   When I first read about the length
of time some Airstream renovations took, I naively thought "that won't be us!" 
Lo and behold the weeks slip by.  Bottom line is it is a drag to have
to work and only be able to devote weekends
to the fun things in life like our Airstream! 

However, a few things are coming together and progress is obvious.
The biggies recently are the installation of our floor.  After reading numerous
blogs by other owners and weighing the pros and cons of various floor options
we chose cork. The reason was durability, flexibility, and how light weight it is.

It actually went in very easily. Thus sayeth the observer!
Due to the way we approached the renovation the floor is not under
any of the cabinets.  There is less flooring going in but also in the event
of a water issue we can pull up the floor without ripping out the
cabinetry/ furniture.  At least this is our theory.  It made the cutting/ install a
little more work, but Robert is an uber talented guy and he sailed through it.

Foam underlayment goes down.  


A little cutting in the bathroom.


I love the contrast with the color of the cabinets and benches!  Just need to add
the rest of the shoe mold and we are done!  Check!


At approximately the same time I decided to take on a little project. With the relocation
of the dinette we needed some lighting over the table.  The obvious solution is
an LED puck light.  Low energy use, they don't get hot and the color in LED
lighting is vastly improving.  We had removed a double head spot light
at the back wall.  So there were wires dangling in the closet that can be rerouted
to the new LED pucks.  I mounted them under the upper cabinets, then
drilled holes for the wires to pull up into the upper storage cabinets.

A nice clean look.


Since the wires don't lay flat this required creating
false floor in the upper cabinet so that things can still
be stored on a level surface. 
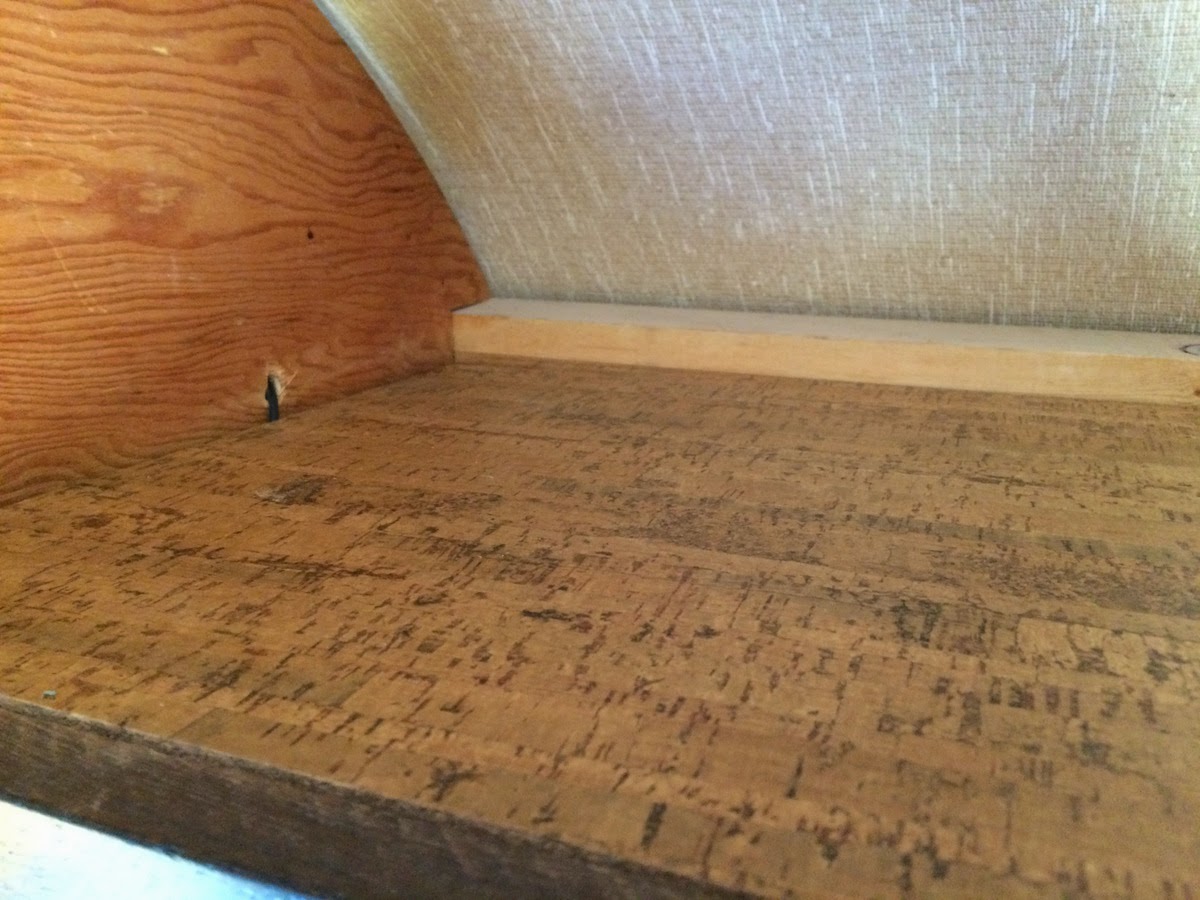

Robert was telling me he had a solution but I had to wait.  So I took matters
into my own hands (patience is not my strong point) and used
some of the left over cork flooring.  After cutting it to size, added some
  small pieces underneath to raise the surface and viola!
I have a nice clean stable floor for the cabinets and you can easily get
to the wiring if need be.  Robert still had a bit of a critical eye
(I think it is mostly because he didn't think of it) but he begrudgingly
gave me props for my simple and fast solution. All he has to do is
pull the available wires into the upper cabinet and we have light.


The last little project was the installation of the tile backsplash. As a
designer I can't imagine not having a tile splash but I am realistic enough
to not want to install something that will crack and pop off because
of the movement in our little trailer. After quite a bit of research and
consulting some of my talented tile contractors I have opted to 
use a small stone and metal mosaic and take it only 4" high.
I also opted to use a metal  trim piece in order to avoid having to
find a small decorative trim piece. My theory is the less glued to the wall the better.

Here is the metal being installed


We applied the tile with a silicone latex caulking.  Mold resistant, flexible,
and it should hold up great.


A close up of the tile.  I think it looks super clean.  Now I just need to grout it.


A larger shot of the splash.   The edge detail still needs to go on the countertop.
We are going to add a silver magnetic metal panel over the large space above the cooktop. 
Cuteness factor all the way. 

We also ordered a new furnace a couple of days ago.  We finally got around to turning on
the one in the trailer and the noise was deafening.  One more thing to add to the list
of stuff to do.  Seems like we check off a few things and add a few things every week.
Par for the course  and we will persevere!
Happy Thanksgiving!


Sunday, November 2, 2014

We have a bed (or at least a place for a bed!)


 Our new license plates for the Airstream have arrived! 

  I had extremely good intentions of updating this blog sooner.  While we are making steady progress 
we also seem to be generating quite a mess and the photo ops are few!  When thinking about how 
we wanted to use our Airstream we knew that we would prefer a full time bed versus making a bed
 out of the dinette every evening.  As I mentioned before, we did a big floor plan flip and have
 built a queen size bed platform where the original dinette was. 


We want to try and take advantage of every square inch and have created
some additional storage at the front of the Airstream that sits above the fresh water tank.


There is a fairly deep box right in the center that will be handy for pajamas or
something and then there is a bin at each end that can hold other things.  Maybe a good book!

Speaking of pajamas I am so excited that Target is carrying some fun PJ's by Nick and Nora.
They are Airstream inspired and beyond cute with pink flamingos and little airstreams.
Being a now loyal Airstream groupie I felt obligated to buy myself a pair!
How can you not love these?


                      Back to the new bed.....we wanted to accomplish a couple of things with this bed frame. 
                                  1-Create usable storage  

                                  2- Keep a little bit of the vintage charm by reusing the original Airstream bins
                                         and hardware that were in the Safari when we purchased it. 

                                   I am super happy with Robert's creative skills and the results. 


The bed platform lifts up and you can reach the additional storage space easily.
We used lifts supports and they went in super easy per Robert. 

At the same time the new dinette is just about done.  While the storage looks original from the
exterior we now have some nice deep storage boxes inside!
Pots and pans should be extremely happy in there!


And I love the new cushions.  They are beyond adorable as far as I am concerned.


Pippa likes the cushions too!

Robert has just started working on the new countertops. This is the one that sits above the 
refrigerator. The pop of color is perfect! There is an existing cabinet that will sit back 
on top of it. I love the red laminate and the vintage metal edge trim is so cute.


looking back at the bed platform

Just a couple of more items.  I have been all over the map trying to come up with an overhead
bin storage solution that worked visually and practically.  The doors originally on these cabinets were
in good condition but in a moment of reckless abandon I removed the doors of the cabinets
which were covered in a wall paper type material.  I thought I would take the wallpaper off and
refinish them.  Upon further inspection the doors were actually a low quality plywood.
In the mean time the hardware that held these doors had been removed (oops) and it is just about
impossible to put it back on. So the quest for a new solution began.

If we were going to put on new doors I wanted some that had a opaque panel in them.
I really wanted a cool piece of resin from a company called 3form. Check them out if you
are the arty type.  They even have a remnant section which is perfect for our application.
 However, I could never find a piece that seemed to be the right choice, in the right size,
 at the right price.  So on to plan B.  I found this vinyl stick on stuff at Home Depot.  
I liked the pattern, liked  the price and we decided to give it a go. Robert
built the new doors and I applied the pattern vinyl to a clear plexiglass sheet.  Easy Peasy! 
 If someday 3form has the most amazing piece of resin available I can change it out.  
Win, win I think!


Last but not least, the new little LED lights have been installed by the bed.  The original
spot lights were a mix of broken and almost broken so we opted to change them out
to these.  Energy efficient, fairly vintage looking and affordable.  I like it.


Still on the list to finish:
  •   new counter top at sink side
  • new sink and cooktop,
  •  table at the dinette
  • install new refrigerator
  • install new hot water heater
  • install new microwave
  • new faucet in bathroom
  • install new flooring
  • hang up curtains and shades
  • PUT IN ALL THE CUTE STUFF!
  •  

Sunday, October 5, 2014

The Renovation Continues and my Danze Faucets Arrive


I found this photo online of a Argosy Owner that has a towing set up that makes me smile. 
As a Mini Cooper owner, I think this is awesome!  Who wouldn't want to take their
"super cute Mini" with them while they hit the road with their "super cool vintage trailer!"
 On top of that it is completely color coordinated!  It makes my design mind so happy,
I call this perfection.

I had a very exciting thing happen a few weeks ago.  Danze faucets heard about our Airstream
renovation project and decided they wanted to be a part of it.  They very generously supplied
me with my new kitchen and bathroom faucets! I can hardly wait for the new countertop
to be installed so I can see how fabulous they are going to look.  Danze has a great
Pinterest page if you are looking for more plumbing fixture design ideas. Danze has
been my go to line of plumbing fixtures for many years. Check them out if you are
wanting a great quality faucet at a nice price. 


Taking old things apart generally results in a Pandora's box of new things to deal with.
  We have found our share to say the least. In the big picture it is all good, it just takes more
time and money than you had thought the week before!  I keep eagerly waiting for the
day we put in the fun stuff,  we keep finding additional (translate to time consuming)
projects to deal with first.

Though the original refrigerator was humming along nicely and all the experts said if you
have a working frig keep it, we realized the investment of replacing all the gaskets
and a couple of freezer door hinges was going to add up to about 1/3 of the cost of a new frig.
  So then you have to ask yourself, do we invest that much in something that is 50 years old?
  Ultimately, we decided no and out came the old frig.  I think we can sell it for scrap and
make a couple of bucks.  I have also decided there is a huge profit margin in refrigerator
gaskets and we should have been selling them all these years instead of building houses.
We might be retired by now.


 Robert had to do a little adjusting of the opening for the new one.  I ordered a new frig
with a stainless panel, so it's all good. It's going in soon I have been told.


The bed frame is just about done and I will update on this project soon too.
Lots still to do, but it is coming along.

Saturday, September 13, 2014

Let's Get Serious, Building the New Dinette!


We finally reached a place where we are ready to build something.
Yea! As I am busy imagining fun little meals at our new dinette with
cute dishes and a great view out the window,  Robert is
working on the nuts and bolts of what we want to accomplish.
Good thing we both understand our "jobs". 

We had decided that the "gaucho" or couch as the rest of us
would call it needed to come out and be replaced by a small dinette.
Since 99% of the time it will just be the two of us and our cute
little dogs,otherwise known as "the girls" we don't need the large dinette
space up front. We can convert that to a permanent bed and skip
the annoyance of having to make up the bed every night. 

There were two control points that created exactly how large this dinette
could be.  We had the refrigerator location that was not moving,
and the back wall to the bathroom was also a fixed point.  With that in
mind and knowing we had to incorporate the wheel well space
into our design we moved forward.  This is where I love the internet.
I spent several hours searching for other peoples solution to this
change to get an idea on what we wanted and how to do it.

Though we are building and designing homes everyday 
we are newbies to the world of RV construction.
 It is a bit of a learning curve to have everything you 
build be controlled by the idea that smaller is better, 
it must be uber functional and as light weight as 
possible. On top of that we need to build things that 
can become something else.  Add the need to keep a cool
vintage vibe to this and there is a lot to think about.
However, we are extremely resourceful
and we will figure this out!

Robert's tip of the day: "find the center of the trailer,
lay down a chalk line and work out from there."
He felt that helped more than anything while building the dinette
due the curving of the airstream walls. 

With a vintage trailer some things are a little brittle, when the wheel
well was exposed you could see the flange had chipped. Robert used a
flexible flashing tape that completely sealed it. Clever!

 We moved two regular chairs in and out of the Airstream
multiple times trying to get an idea for how the dinette would
feel after it was built.  There are certain dimensions that make for a
comfortable sitting experience and we tried to hold true to those
while staying within the building space.  We also wanted it
to be able to become a twin bed if ever needed.
 
The final dimensions for the dinette are
bench 36" Wide
 seat height 15" tall
the finished seat depth is 19", overall build depth was 24"
seat back is 18 3/4 " high. 
This allows for a 4" cushion and hopefully a comfortable bed if need be.
This gives us a table that is approx 28" W x 36 " L

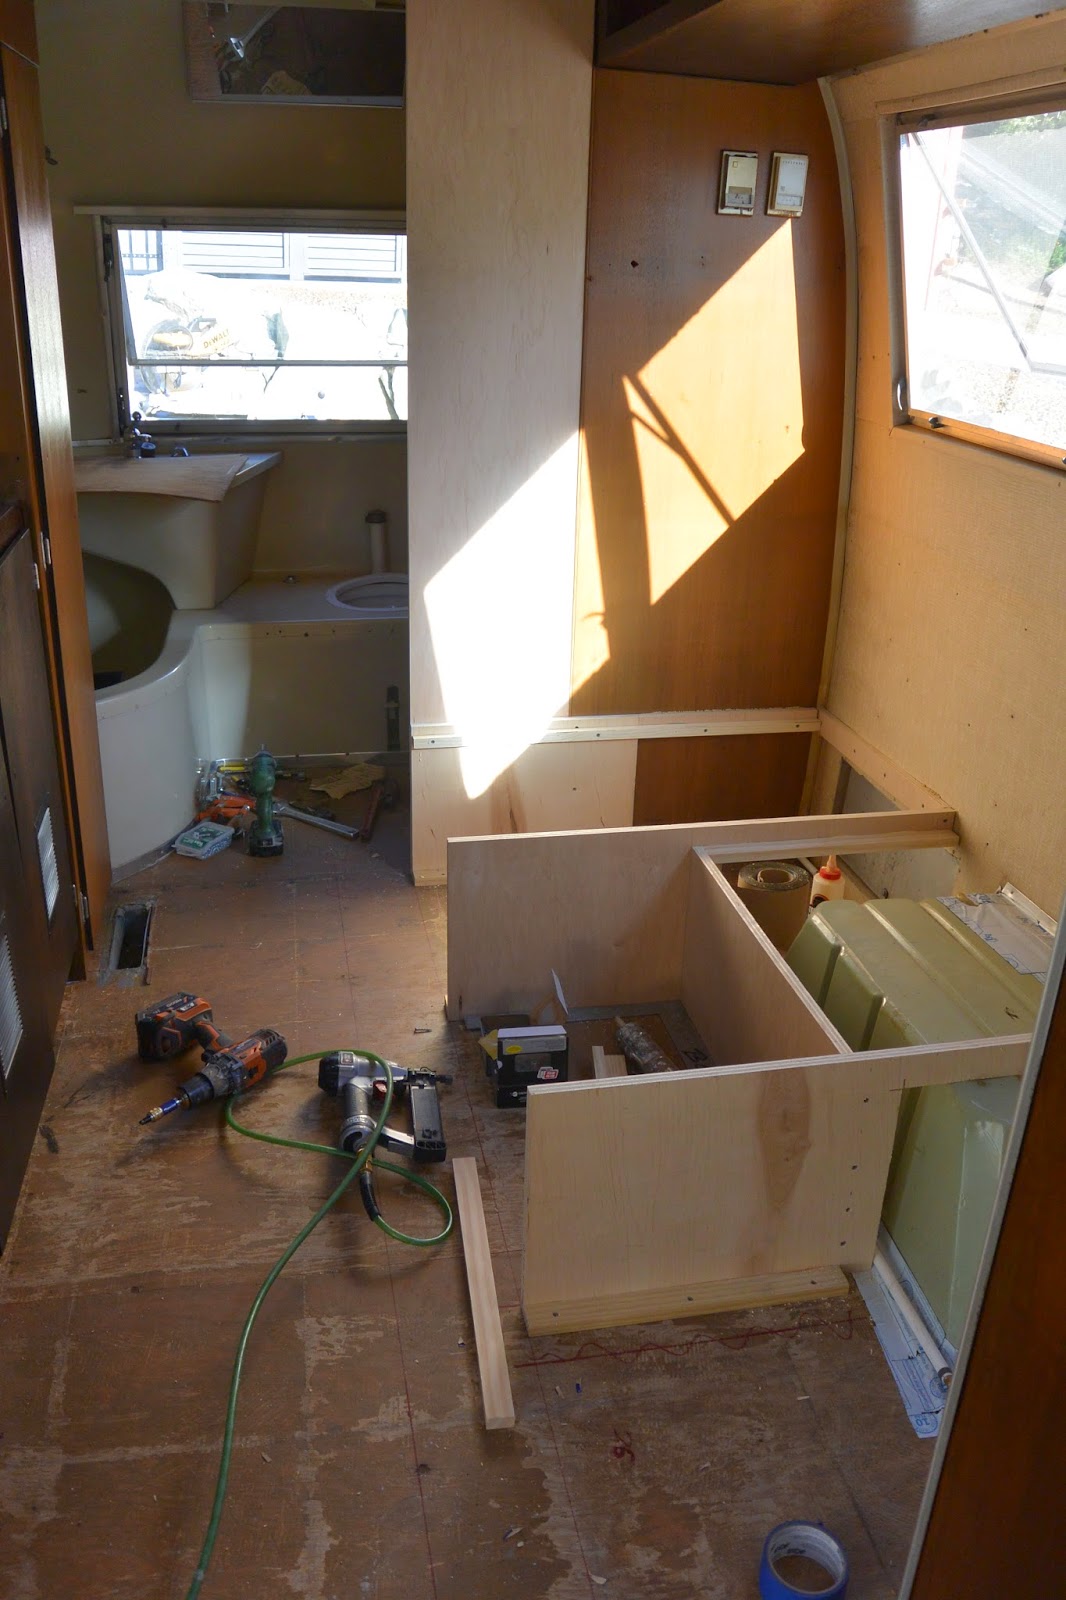
Dry fitting for the wheel well cover

Framing at the wall for the bench seats
 You can see we added a tall panel behind the bench
leading into the bathroom.  We are going to add
a real door here.  The original accordion door was
in bad shape and didn't appeal to me as a permanent
solution for the bathroom door. As a bonus it creates
more wall space in the bathroom. 

Trying to figure out how much slope we can
add to the bench back
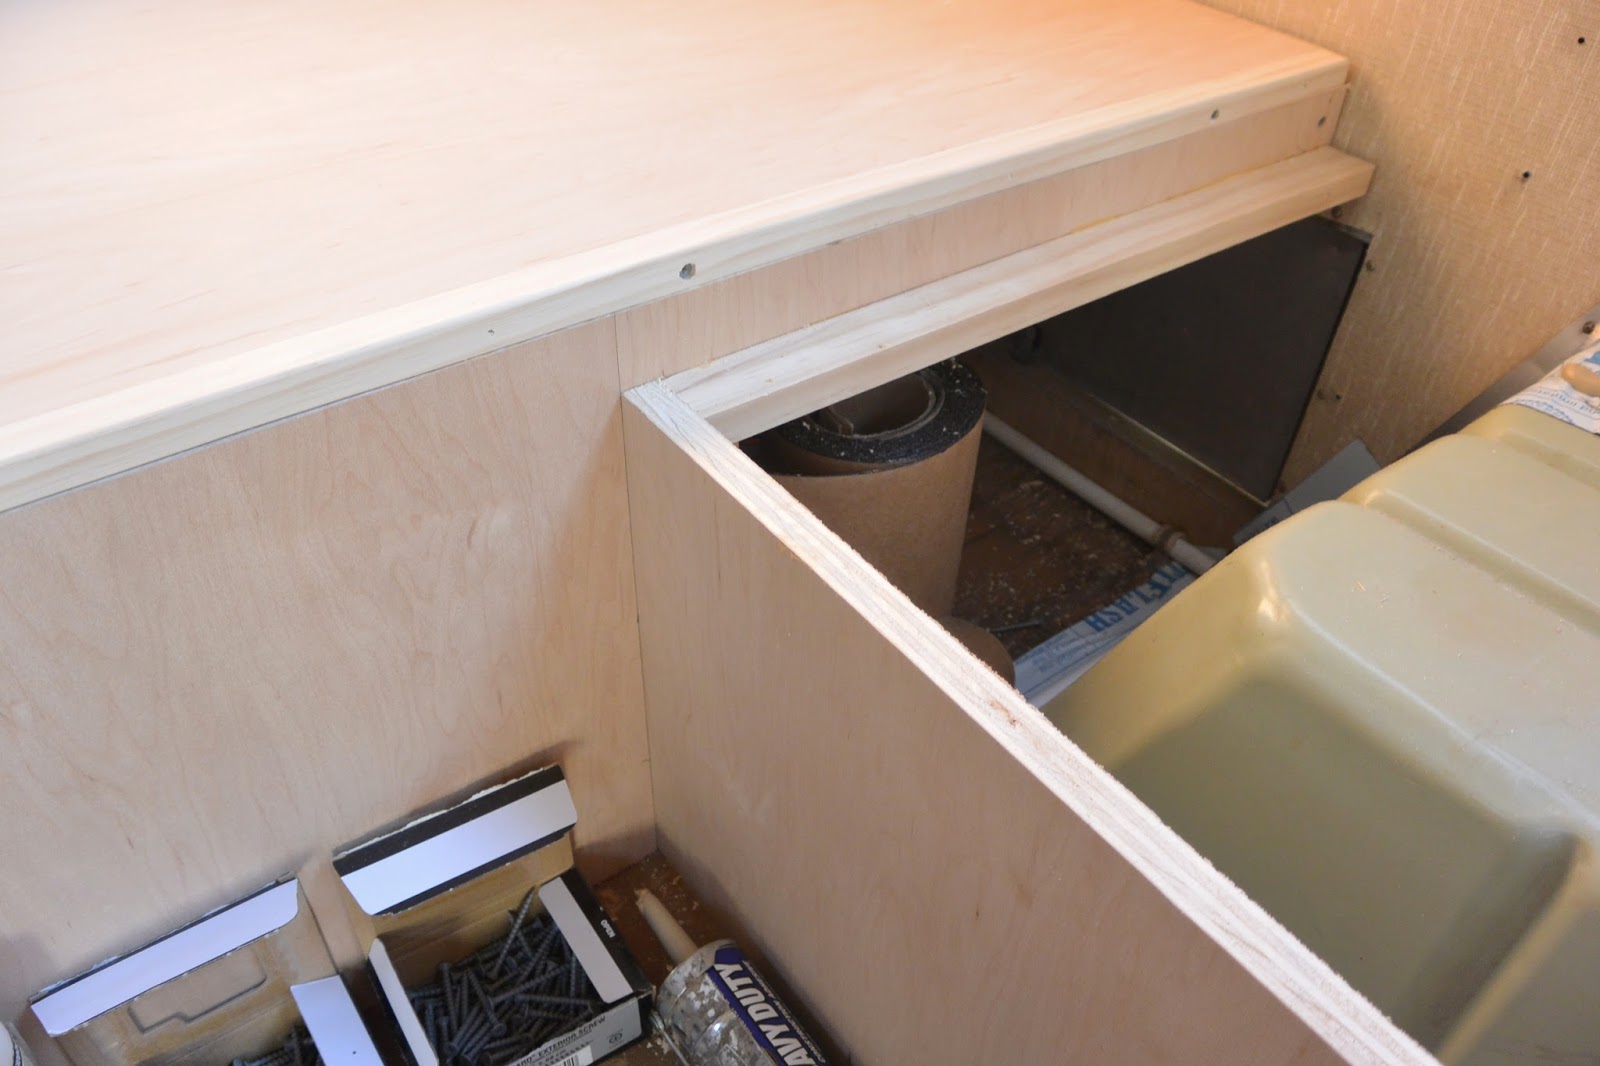
Up close view of the height difference of the bench and wheel
well cover.  The table will drop down into this space when it
becomes a bed.  He added a cleat to the bench front upon completion


 The dinette is just about complete.  The under the bench storage
still needs doors.  Then we stain and move forward!  I have ordered the
wall bracket for the table, a removable table leg, the vintage
table edge moulding and the laminate.  I am an awesome
material supply manager!

Lest we loose sight of the big picture this is the fabric
for the new cushions. They are currently in production
with the upholsterer! 

Cushion fabric
 
New stain color

Love this new poppy red color for the table top
On to the new bed frame next!

Tuesday, September 9, 2014

Putting the Plan into Action


My best furry friend Pippa was helping me plan the changes we wanted to make.

Following the advice of our timely fortune cookie we began the process
of planning our redo and quickly after that we began the tear out. 

I read a blog recently where the writer explained that she and
her husband were great partners in their projects but they
had discovered that they were most successful when each was
doing a separate job rather than working together on the same job.
Kind of like the parallel play they do in kindergarten.
I just had to laugh and promptly read the blog to Robert and
told him she could have been writing about us.

We have owned a design/ build construction company for
over 20 years  Board by Board. With that has come countless projects
for clients and multiple homes, projects and remodels for
ourselves.  Though it is said that building or remodeling is one of
the most stressful things you can do to your marriage,
we have never really found that to be the case for us personally.
We are an awesome team, creative, eager to accomplish our goal.
We want it to look great and be a little outside of the box.

I am the big picture girl.  I get excited and do a lot of hand waving and
sketching to share my vision.  I typically don't concern
myself with the fine details when I work with Robert,
that's his area of expertise.  He is extremely talented and often even
improves the plan. However, on more than one occasion Robert has
suggested that if there was something else I had to do I
should feel free to move on!  In other words quit hovering and micromanaging!
That in a nutshell is how we make our project ridden relationship work!


 As I mentioned the trailer was in good shape but we decided for it to work for us we
wanted to take out the front dinette and make it a space for a permanent Queen bed.
Then take the gaucho out and turn that into a smaller dinette.


Sophie was around to help

Just to get the ball rolling, one evening not long after we brought the
Safari home I suggested we go out and just take down the deteriorating
accordion door that was the door to the bathroom. Well that took about 45
seconds so we looked around and said, "hmmm.... what else can we take apart" 
and the rest as they say quickly became history.


We have quite the collection of nuts and bolts that have
come out of the Safari.  We opted to keep everything we pulled
out just in case we needed something as we put things back together.

In my fantasy world we would be quickly moving on to install the new
cork floor that I had picked out, but Robert had better ideas and opted to
check out all the systems to insure we were in good shape before it
was all put  back together.  Good advice to anyone doing one of these projects.
Fortunately he did, as it turned out our water heater
had a leak and it gave us a chance to update the plumbing with Pex.

Old water heater out.  Maybe we can sell it for scrap.


The previous owners left us 2 souvenirs.  A vintage hair roller
and this postcard from a 1969 Airstream Rally in Nebraska.
I am guessing they must have attended.  Kind of cool!
Partial post card we found

Actual photo, crazy to imagine what this must have been like in person.
So now we have gutted the Safari to the extent we had planned. The floor is in
very good shape, no water damage or leaking areas showed up.
One of the plus's of buying a vintage trailer in a dry climate.

 We are going to keep the bathroom just about as it is for now.
The bathroom is in great shape considering it is 50 years old.
We will add a new faucet, toilet seat and a real door.

In the kitchen we are going to change the sink, faucet and counter tops.
Probably add a small microwave and definitely a backsplash.
New cork flooring will go down and we are going to re-stain the cabinetry in a
two tone palette.  That should take about 3 weekends I am guessing.  I now realize that was
rather naive thinking! Oh well, we all need a positive person on the project, right?